Usage Overview
Paperless is an application that manages your personal documents. With the help of a document scanner (see the scanners wiki), paperless transforms your unwieldy physical document binders into a searchable archive and provides many utilities for finding and managing your documents.
Terms and definitions
Paperless essentially consists of two different parts for managing your documents:
- The consumer watches a specified folder and adds all documents in that folder to paperless.
- The web server provides a UI that you use to manage and search for your scanned documents.
Each document has a couple of fields that you can assign to them:
- A Document is a piece of paper that sometimes contains valuable information.
- The correspondent of a document is the person, institution or company that a document either originates from, or is sent to.
- A tag is a label that you can assign to documents. Think of labels as more powerful folders: Multiple documents can be grouped together with a single tag, however, a single document can also have multiple tags. This is not possible with folders. The reason folders are not implemented in paperless is simply that tags are much more versatile than folders.
- A document type is used to demarcate the type of a document such as letter, bank statement, invoice, contract, etc. It is used to identify what a document is about.
- The date added of a document is the date the document was scanned into paperless. You cannot and should not change this date.
- The date created of a document is the date the document was initially issued. This can be the date you bought a product, the date you signed a contract, or the date a letter was sent to you.
- The archive serial number (short: ASN) of a document is the identifier of the document in your physical document binders. See recommended workflow below.
- The content of a document is the text that was OCR'ed from the document. This text is fed into the search engine and is used for matching tags, correspondents and document types.
Adding documents to paperless
Once you've got Paperless setup, you need to start feeding documents into it. When adding documents to paperless, it will perform the following operations on your documents:
- OCR the document, if it has no text. Digital documents usually have text, and this step will be skipped for those documents.
- Paperless will create an archivable PDF/A document from your document. If this document is coming from your scanner, it will have embedded selectable text.
- Paperless performs automatic matching of tags, correspondents and types on the document before storing it in the database.
Tip
This process can be configured to fit your needs. If you don't want
paperless to create archived versions for digital documents, you can
configure that by configuring
PAPERLESS_OCR_SKIP_ARCHIVE_FILE=with_text. Please read the
relevant section in the documentation.
Note
No matter which options you choose, Paperless will always store the original document that it found in the consumption directory or in the mail and will never overwrite that document. Archived versions are stored alongside the original versions. Any files found in the consumption directory will stored inside the Paperless-ngx file structure and will not be retained in the consumption directory.
The consumption directory
The primary method of getting documents into your database is by putting them in the consumption directory. The consumer waits patiently, looking for new additions to this directory. When it finds them, the consumer goes about the process of parsing them with the OCR, indexing what it finds, and storing it in the media directory. You should think of this folder as a temporary location, as files will be re-created inside Paperless-ngx and removed from the consumption folder.
Getting stuff into this directory is up to you. If you're running Paperless on your local computer, you might just want to drag and drop files there, but if you're running this on a server and want your scanner to automatically push files to this directory, you'll need to setup some sort of service to accept the files from the scanner. Typically, you're looking at an FTP server like Proftpd or a Windows folder share with Samba.
Warning
Files found in the consumption directory that are consumed will be removed from the consumption directory and stored inside the Paperless-ngx file structure using any settings / storage paths you have specified. This action is performed as safely as possible but this means it is expected that files in the consumption directory will no longer exist (there) after being consumed.
Web UI Upload
The dashboard has a button to upload documents to paperless or you can simply drag a file anywhere into the app to initiate the consumption process.
Mobile upload
Please see the wiki for a user-maintained list of affiliated projects and software (e.g. for mobile devices) that is compatible with Paperless-ngx.
IMAP (Email)
You can tell paperless-ngx to consume documents from your email accounts. This is a very flexible and powerful feature, if you regularly received documents via mail that you need to archive. The mail consumer can be configured via the frontend settings (/settings/mail) in the following manner:
- Define e-mail accounts.
- Define mail rules for your account.
These rules perform the following:
- Connect to the mail server.
- Fetch all matching mails (as defined by folder, maximum age and the filters)
- Check if there are any consumable attachments.
- If so, instruct paperless to consume the attachments and optionally use the metadata provided in the rule for the new document.
- If documents were consumed from a mail, the rule action is performed on that mail.
Paperless will check all emails only once and completely ignore messages that do not match your filters. It will also only perform the rule action on e-mails that it has consumed documents from.
The actions all ensure that the same mail is not consumed twice by different means. These are as follows:
- Delete: Immediately deletes mail that paperless has consumed documents from. Use with caution.
- Mark as read: Mark consumed mail as read. Paperless will not consume documents from already read mails. If you read a mail before paperless sees it, it will be ignored.
- Flag: Sets the 'important' flag on mails with consumed documents. Paperless will not consume flagged mails.
- Move to folder: Moves consumed mails out of the way so that paperless won't consume them again.
-
Add custom Tag: Adds a custom tag to mails with consumed documents (the IMAP standard calls these "keywords"). Paperless will not consume mails already tagged. Not all mail servers support this feature!
-
Apple Mail support: Apple Mail clients allow differently colored tags. For this to work use
apple:<color>(e.g. apple:green) as a custom tag. Available colors are red, orange, yellow, blue, green, violet and grey.
Warning
The mail consumer will perform these actions on all mails it has consumed documents from. Keep in mind that the actual consumption process may fail for some reason, leaving you with missing documents in paperless.
Note
With the correct set of rules, you can completely automate your email documents. Create rules for every correspondent you receive digital documents from and paperless will read them automatically. The default action "mark as read" is pretty tame and will not cause any damage or data loss whatsoever.
You can also setup a special folder in your mail account for paperless and use your favorite mail client to move to be consumed mails into that folder automatically or manually and tell paperless to move them to yet another folder after consumption. It's up to you.
Note
When defining a mail rule with a folder, you may need to try different characters to define how the sub-folders are separated. Common values include ".", "/" or "|", but this varies by the mail server. Check the documentation for your mail server. In the event of an error fetching mail from a certain folder, check the Paperless logs. When a folder is not located, Paperless will attempt to list all folders found in the account to the Paperless logs.
Note
Paperless will process the rules in the order defined in the admin page.
You can define catch-all rules and have them executed last to consume any documents not matched by previous rules. Such a rule may assign an "Unknown mail document" tag to consumed documents so you can inspect them further.
Paperless is set up to check your mails every 10 minutes. This can be
configured via PAPERLESS_EMAIL_TASK_CRON
REST API
You can also submit a document using the REST API, see POSTing documents for details.
Permissions
Permissions in Paperless-ngx are based around 'global' permissions as well as 'object-level' permissions. Global permissions determine which parts of the application a user can access (e.g. Documents, Tags, Settings) and object-level determine which objects are visible or editable. All objects have an 'owner' and 'view' and 'edit' permissions which can be granted to other users or groups. The paperless-ngx permissions system uses the built-in user model of the backend framework, Django.
Tip
Object-level permissions only apply to the object itself. In other words, setting permissions for a Tag will not affect the permissions of documents that have the Tag.
Permissions can be set using the new "Permissions" tab when editing documents, or bulk-applied in the UI by selecting documents and choosing the "Permissions" button.
Default permissions
Workflows provide advanced ways to control permissions.
For objects created via the web UI (tags, doc types, etc.) the default is to set the current user as owner and no extra permissions, but you can explicitly set these under Settings > Permissions.
Documents consumed via the consumption directory do not have an owner or additional permissions set by default, but again, can be controlled with Workflows.
Users and Groups
Paperless-ngx supports editing users and groups via the 'frontend' UI, which can be found under Settings > Users & Groups, assuming the user has access. If a user is designated as a member of a group those permissions will be inherited and this is reflected in the UI. Explicit permissions can be granted to limit access to certain parts of the UI (and corresponding API endpoints).
Note
Superusers can access all parts of the front and backend application as well as any and all objects.
Detailed Explanation of Global Permissions
Global permissions define what areas of the app and API endpoints the user can access. For example, they determine if a user can create, edit, delete or view any documents, but individual documents themselves still have "object-level" permissions.
| Type | Details |
|---|---|
| Admin | View or higher permissions grants access to the logs view as well as the system status. |
| AppConfig | Change or higher permissions grants access to the "Application Configuration" area. |
| Correspondent | Grants global permissions to add, edit, delete or view Correspondents. |
| CustomField | Grants global permissions to add, edit, delete or view Custom Fields. |
| Document | Grants global permissions to add, edit, delete or view Documents. |
| DocumentType | Grants global permissions to add, edit, delete or view Document Types. |
| Group | Grants global permissions to add, edit, delete or view Groups. |
| MailAccount | Grants global permissions to add, edit, delete or view Mail Accounts. |
| MailRule | Grants global permissions to add, edit, delete or view Mail Rules. |
| Note | Grants global permissions to add, edit, delete or view Notes. |
| PaperlessTask | Grants global permissions to view or dismiss (Change) File Tasks. |
| SavedView | Grants global permissions to add, edit, delete or view Saved Views. |
| ShareLink | Grants global permissions to add, delete or view Share Links. |
| StoragePath | Grants global permissions to add, edit, delete or view Storage Paths. |
| Tag | Grants global permissions to add, edit, delete or view Tags. |
| UISettings | Grants global permissions to add, edit, delete or view the UI settings that are used by the web app. Users expected to access the web UI should usually be granted at least View permissions. |
| User | Grants global permissions to add, edit, delete or view Users. |
| Workflow | Grants global permissions to add, edit, delete or view Workflows. Note that Workflows are global, in other words all users who can access workflows have access to the same set of them. |
Detailed Explanation of Object Permissions
| Type | Details |
|---|---|
| Owner | By default objects are only visible and editable by their owner. Only the object owner can grant permissions to other users or groups. Additionally, only document owners can create share links and add / remove custom fields. For backwards compatibility objects can have no owner which makes them visible to any user. |
| View | Confers the ability to view (not edit) a document, tag, etc. Users without 'view' (or higher) permissions will be shown 'Private' in place of the object name for example when viewing a document with a tag for which the user doesn't have permissions. |
| Edit | Confers the ability to edit (and view) a document, tag, etc. |
Password reset
In order to enable the password reset feature you will need to setup an SMTP backend, see
PAPERLESS_EMAIL_HOST. If your installation does not have
PAPERLESS_URL set, the reset link included in emails will use the server host.
Workflows
Note
v2.3 added "Workflows" and existing "Consumption Templates" were converted automatically to the new more powerful format.
Workflows allow hooking into the Paperless-ngx document pipeline, for example to alter what metadata (tags, doc types) and permissions (owner, privileges) are assigned to documents. Workflows can have multiple 'triggers' and 'actions'. Triggers are events (with optional filtering rules) that will cause the workflow to be run and actions are the set of sequential actions to apply.
In general, workflows and any actions they contain are applied sequentially by sort order. For "assignment" actions, subsequent workflow actions will override previous assignments, except for assignments that accept multiple items e.g. tags, custom fields and permissions, which will be merged.
Workflow Triggers
Currently, there are three events that correspond to workflow trigger 'types':
- Consumption Started: before a document is consumed, so events can include filters by source (mail, consumption folder or API), file path, file name, mail rule
- Document Added: after a document is added. At this time, file path and source information is no longer available, but the document content has been extracted and metadata such as document type, tags, etc. have been set, so these can now be used for filtering.
- Document Updated: when a document is updated. Similar to 'added' events, triggers can include filtering by content matching, tags, doc type, or correspondent.
The following flow diagram illustrates the three trigger types:
flowchart TD
    consumption{"Matching
    'Consumption'
    trigger(s)"}

    added{"Matching
    'Added'
    trigger(s)"}

    updated{"Matching
    'Updated'
    trigger(s)"}

    A[New Document] --> consumption
    consumption --> |Yes| C[Workflow Actions Run]
    consumption --> |No| D
    C --> D[Document Added]
    D -- Paperless-ngx 'matching' of tags, etc. --> added
    added --> |Yes| F[Workflow Actions Run]
    added --> |No| G
    F --> G[Document Finalized]
    H[Existing Document Changed] --> updated
    updated --> |Yes| J[Workflow Actions Run]
    updated --> |No| K
    J --> K[Document Saved]
Filters
Workflows allow you to filter by:
- Source, e.g. documents uploaded via consume folder, API (& the web UI) and mail fetch
- File name, including wildcards e.g. *.pdf will apply to all pdfs
- File path, including wildcards. Note that enabling
PAPERLESS_CONSUMER_RECURSIVEwould allow, for example, automatically assigning documents to different owners based on the upload directory. - Mail rule. Choosing this option will force 'mail fetch' to be the workflow source.
- Content matching (
AddedandUpdatedtriggers only). Filter document content using the matching settings. - Tags (
AddedandUpdatedtriggers only). Filter for documents with any of the specified tags - Document type (
AddedandUpdatedtriggers only). Filter documents with this doc type - Correspondent (
AddedandUpdatedtriggers only). Filter documents with this correspondent
Workflow Actions
There are currently two types of workflow actions, "Assignment", which can assign:
- Title, see title placeholders below
- Tags, correspondent, document type and storage path
- Document owner
- View and / or edit permissions to users or groups
- Custom fields. Note that no value for the field will be set
and "Removal" actions, which can remove either all of or specific sets of the following:
- Tags, correspondents, document types or storage paths
- Document owner
- View and / or edit permissions
- Custom fields
Title placeholders
Workflow titles can include placeholders but the available options differ depending on the type of workflow trigger. This is because at the time of consumption (when the title is to be set), no automatic tags etc. have been applied. You can use the following placeholders with any trigger type:
{correspondent}: assigned correspondent name{document_type}: assigned document type name{owner_username}: assigned owner username{added}: added datetime{added_year}: added year{added_year_short}: added year{added_month}: added month{added_month_name}: added month name{added_month_name_short}: added month short name{added_day}: added day{added_time}: added time in HH:MM format{original_filename}: original file name without extension
The following placeholders are only available for "added" or "updated" triggers
{created}: created datetime{created_year}: created year{created_year_short}: created year{created_month}: created month{created_month_name}: created month name{created_month_name_short}: created month short name{created_day}: created day{created_time}: created time in HH:MM format
Workflow permissions
All users who have application permissions for editing workflows can see the same set of workflows. In other words, workflows themselves intentionally do not have an owner or permissions.
Given their potentially far-reaching capabilities, you may want to restrict access to workflows.
Upon migration, existing installs will grant access to workflows to users who can add documents (and superusers who can always access all parts of the app).
Custom Fields
Paperless-ngx supports the use of custom fields for documents as of v2.0, allowing a user to optionally attach data to documents which does not fit in the existing set of fields Paperless-ngx provides.
- First, create a custom field (under "Manage"), with a given name and data type. This could be something like "Invoice Number" or "Date Paid", with a data type of "Number", "Date", "String", etc.
- Once created, a field can be used with documents and data stored. To do so, use the "Custom Fields" menu on the document detail page, choose your existing field and click "Add". Once the field is visible in the form you can enter the appropriate data which will be validated according to the custom field "data type".
- Fields can be removed by hovering over the field name revealing a "Remove" button.
Important
Added / removed fields, as well as any data is not saved to the document until you actually hit the "Save" button, similar to other changes on the document details page.
Note
Once the data type for a field is set, it cannot be changed.
Multiple fields may be attached to a document but the same field name cannot be assigned multiple times to the a single document.
The following custom field types are supported:
Text: any textBoolean: true / false (check / unchecked) fieldDate: dateURL: a valid urlInteger: integer number e.g. 12Number: float number e.g. 12.3456Monetary: ISO 4217 currency code and a number with exactly two decimals, e.g. USD12.30Document Link: reference(s) to other document(s) displayed as links, automatically creates a symmetrical link in reverse
Share Links
Paperless-ngx added the ability to create shareable links to files in version 2.0. You can find the button for this on the document detail screen.
- Share links do not require a user to login and thus link directly to a file.
- Links are unique and are of the form
{paperless-url}/share/{randomly-generated-slug}. - Links can optionally have an expiration time set.
- After a link expires or is deleted users will be redirected to the regular paperless-ngx login.
Tip
If your paperless-ngx instance is behind a reverse-proxy you may want to create an exception to bypass any authentication layers that are part of your setup in order to make links truly publicly-accessible. Of course, do so with caution.
PDF Actions
Paperless-ngx supports 3 basic editing operations for PDFs (these operations cannot be performed on non-PDF files):
- Merging documents: available when selecting multiple documents for 'bulk editing'
- Rotating documents: available when selecting multiple documents for 'bulk editing' and from an individual document's details page.
- Splitting documents: available from an individual document's details page
Important
Note that rotation alters the Paperless-ngx original file, which would, for example, invalidate a digital signature.
Best practices
Paperless offers a couple tools that help you organize your document collection. However, it is up to you to use them in a way that helps you organize documents and find specific documents when you need them. This section offers a couple ideas for managing your collection.
Document types allow you to classify documents according to what they are. You can define types such as "Receipt", "Invoice", or "Contract". If you used to collect all your receipts in a single binder, you can recreate that system in paperless by defining a document type, assigning documents to that type and then filtering by that type to only see all receipts.
Not all documents need document types. Sometimes its hard to determine what the type of a document is or it is hard to justify creating a document type that you only need once or twice. This is okay. As long as the types you define help you organize your collection in the way you want, paperless is doing its job.
Tags can be used in many different ways. Think of tags are more versatile folders or binders. If you have a binder for documents related to university / your car or health care, you can create these binders in paperless by creating tags and assigning them to relevant documents. Just as with documents, you can filter the document list by tags and only see documents of a certain topic.
With physical documents, you'll often need to decide which folder the document belongs to. The advantage of tags over folders and binders is that a single document can have multiple tags. A physical document cannot magically appear in two different folders, but with tags, this is entirely possible.
Tip
This can be used in many different ways. One example: Imagine you're working on a particular task, such as signing up for university. Usually you'll need to collect a bunch of different documents that are already sorted into various folders. With the tag system of paperless, you can create a new group of documents that are relevant to this task without destroying the already existing organization. When you're done with the task, you could delete the tag again, which would be equal to sorting documents back into the folder they belong into. Or keep the tag, up to you.
All of the logic above applies to correspondents as well. Attach them to documents if you feel that they help you organize your collection.
When you've started organizing your documents, create a couple saved views for document collections you regularly access. This is equal to having labeled physical binders on your desk, except that these saved views are dynamic and simply update themselves as you add documents to the system.
Here are a couple examples of tags and types that you could use in your collection.
- An
inboxtag for newly added documents that you haven't manually edited yet. - A tag
carfor everything car related (repairs, registration, insurance, etc) - A tag
todofor documents that you still need to do something with, such as reply, or perform some task online. - A tag
bank account xfor all bank statement related to that account. - A tag
mailfor anything that you added to paperless via its mail processing capabilities. - A tag
missing_metadatawhen you still need to add some metadata to a document, but can't or don't want to do this right now.
Searching
Paperless offers an extensive searching mechanism that is designed to allow you to quickly find a document you're looking for (for example, that thing that just broke and you bought a couple months ago, that contract you signed 8 years ago).
When you search paperless for a document, it tries to match this query against your documents. Paperless will look for matching documents by inspecting their content, title, correspondent, type and tags. Paperless returns a scored list of results, so that documents matching your query better will appear further up in the search results.
By default, paperless returns only documents which contain all words typed in the search bar. However, paperless also offers advanced search syntax if you want to drill down the results further.
Matching documents with logical expressions:
Matching specific tags, correspondents or types:
Matching dates:
Matching inexact words:
Note
Inexact terms are hard for search indexes. These queries might take a while to execute. That's why paperless offers auto complete and query correction.
All of these constructs can be combined as you see fit. If you want to learn more about the query language used by paperless, paperless uses Whoosh's default query language. Head over to Whoosh query language. For details on what date parsing utilities are available, see Date parsing.
The recommended workflow
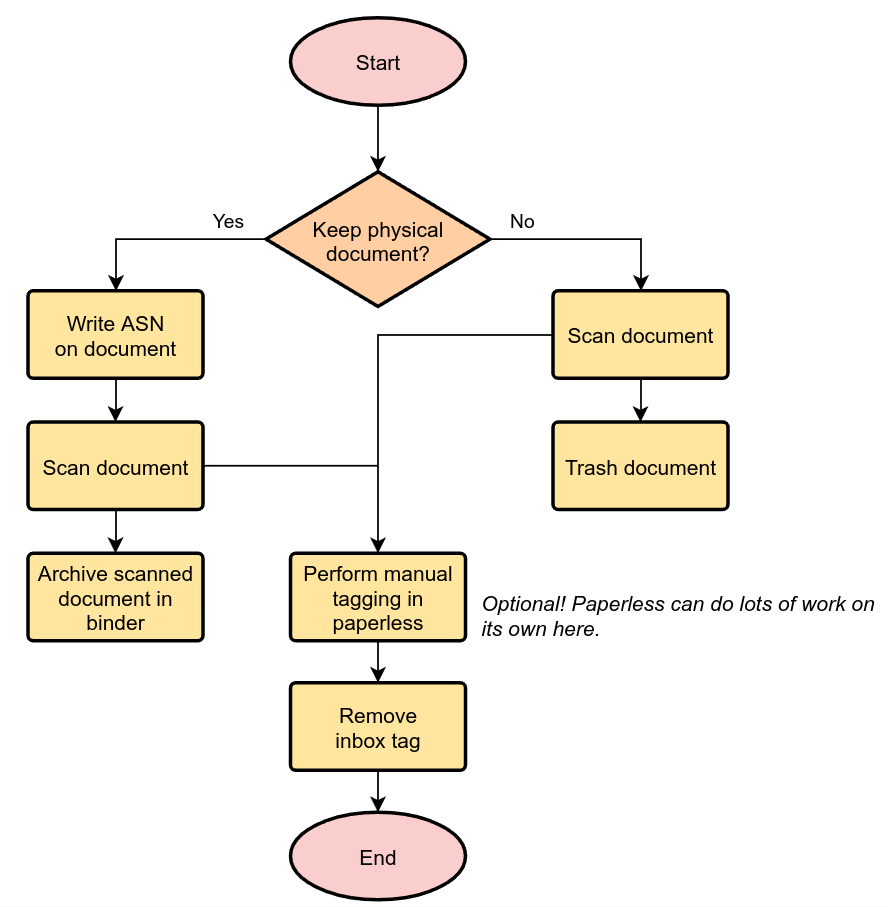
Once you have familiarized yourself with paperless and are ready to use it for all your documents, the recommended workflow for managing your documents is as follows. This workflow also takes into account that some documents have to be kept in physical form, but still ensures that you get all the advantages for these documents as well.
The following diagram shows how easy it is to manage your documents.
Preparations in paperless
- Create an inbox tag that gets assigned to all new documents.
- Create a TODO tag.
Processing of the physical documents
Keep a physical inbox. Whenever you receive a document that you need to archive, put it into your inbox. Regularly, do the following for all documents in your inbox:
- For each document, decide if you need to keep the document in physical form. This applies to certain important documents, such as contracts and certificates.
- If you need to keep the document, write a running number on the document before scanning, starting at one and counting upwards. This is the archive serial number, or ASN in short.
- Scan the document.
- If the document has an ASN assigned, store it in a single binder, sorted by ASN. Don't order this binder in any other way.
- If the document has no ASN, throw it away. Yay!
Tip
Instead of writing a number on the document by hand, you may also prepare
a spool of labels with barcodes with an ascending serial number, that are
formatted like ASN00001.
This also enables Paperless to automatically parse and process the ASN
(if enabled in the config), so that you don't need to manually assign it.
Over time, you will notice that your physical binder will fill up. If it is full, label the binder with the range of ASNs in this binder (i.e., "Documents 1 to 343"), store the binder in your cellar or elsewhere, and start a new binder.
The idea behind this process is that you will never have to use the physical binders to find a document. If you need a specific physical document, you may find this document by:
- Searching in paperless for the document.
- Identify the ASN of the document, since it appears on the scan.
- Grab the relevant document binder and get the document. This is easy since they are sorted by ASN.
Processing of documents in paperless
Once you have scanned in a document, proceed in paperless as follows.
- If the document has an ASN, assign the ASN to the document.
- Assign a correspondent to the document (i.e., your employer, bank, etc) This isn't strictly necessary but helps in finding a document when you need it.
- Assign a document type (i.e., invoice, bank statement, etc) to the document This isn't strictly necessary but helps in finding a document when you need it.
- Assign a proper title to the document (the name of an item you bought, the subject of the letter, etc)
- Check that the date of the document is correct. Paperless tries to read the date from the content of the document, but this fails sometimes if the OCR is bad or multiple dates appear on the document.
- Remove inbox tags from the documents.
Tip
You can setup manual matching rules for your correspondents and tags and paperless will assign them automatically. After consuming a couple documents, you can even ask paperless to learn when to assign tags and correspondents by itself. For details on this feature, see advanced matching.
Task management
Some documents require attention and require you to act on the document. You may take two different approaches to handle these documents based on how regularly you intend to scan documents and use paperless.
- If you scan and process your documents in paperless regularly, assign a TODO tag to all scanned documents that you need to process. Create a saved view on the dashboard that shows all documents with this tag.
- If you do not scan documents regularly and use paperless solely for archiving, create a physical todo box next to your physical inbox and put documents you need to process in the TODO box. When you performed the task associated with the document, move it to the inbox.
Architecture
Paperless-ngx consists of the following components:
- The webserver: This serves the administration pages, the API, and the new frontend. This is the main tool you'll be using to interact with paperless. You may start the webserver directly with
or by any other means such as Apache mod_wsgi.
- The consumer: This is what watches your consumption folder for documents. However, the consumer itself does not really consume your documents. Now it notifies a task processor that a new file is ready for consumption. I suppose it should be named differently. This was also used to check your emails, but that's now done elsewhere as well.
Start the consumer with the management command document_consumer:
- The task processor: Paperless relies on Celery - Distributed Task Queue for doing most of the heavy lifting. This is a task queue that accepts tasks from multiple sources and processes these in parallel. It also comes with a scheduler that executes certain commands periodically.
This task processor is responsible for:
- Consuming documents. When the consumer finds new documents, it notifies the task processor to start a consumption task.
- The task processor also performs the consumption of any documents you upload through the web interface.
- Consuming emails. It periodically checks your configured accounts for new emails and notifies the task processor to consume the attachment of an email.
- Maintaining the search index and the automatic matching algorithm. These are things that paperless needs to do from time to time in order to operate properly.
This allows paperless to process multiple documents from your consumption folder in parallel! On a modern multi core system, this makes the consumption process with full OCR blazingly fast.
The task processor comes with a built-in admin interface that you can use to check whenever any of the tasks fail and inspect the errors (i.e., wrong email credentials, errors during consuming a specific file, etc).
-
A redis message broker: This is a really lightweight service that is responsible for getting the tasks from the webserver and the consumer to the task scheduler. These run in a different process (maybe even on different machines!), and therefore, this is necessary.
-
Optional: A database server. Paperless supports PostgreSQL, MariaDB and SQLite for storing its data.